It's easy and fun to show support for your fave bloggers and linky//hop parties by grabbing their buttons and placing them on your blog. But what happens when those buttons don't fit inside your sidebar widths? Or they line up differently some to the left, others to the right, and some running straight down the center? It's obnoxious and frustrating and if you aren't sure of how to read or add HTML within the button codes you might be feeling helpless. Here are two quick tips to get your buttons, buttoned up!
Aligning Blog Buttons
Some button codes are created to center the button or position it left or right. You can either match all of your button codes to the same direction or just remove this section of the code all together. Let's look at the HTML for my blog button.....
<a border="0" href="http://www.heartshapedsweat.com/" target="_blank"><img src="http://i96.photobucket.com/albums/l194/krferrall/blogbuttonwpic200px.png" /></a>
This is the beef of a button's code. they all start with <a and end with /a>. not all buttons will have specifics for its border at the beginning of the code. Alot of times a buttons code will start with <a href=
My blog button is set to have no borders (no additional width or height other than the 200x200). My button code was also created without any alignment of left, right, or center. If I wanted it centered here's how it would look.
<center><a border="0" href="http://www.heartshapedsweat.com/" target="_blank"><img src="http://i96.photobucket.com/albums/l194/krferrall/blogbuttonwpic200px.png" /></a></center>
Everything in red is new to the button code. The parts in red position the button in the center. If I wanted it aligned to the left or right then you would see the word left or right in place of the word center.
Get it ???
When you read the HTML of your buttons decide if you want to add this alignment or not. It is your choice as to how you want buttons aligned on your blog. Also, if you grab a button that is set to align in the center (etc.) and don't like that....simply delete everything in red. Do not delete anything else in the buttons code. *this is the basic, sometimes the code is a bit more complex but this will get you started and familiarized!
When you read the HTML of your buttons decide if you want to add this alignment or not. It is your choice as to how you want buttons aligned on your blog. Also, if you grab a button that is set to align in the center (etc.) and don't like that....simply delete everything in red. Do not delete anything else in the buttons code. *this is the basic, sometimes the code is a bit more complex but this will get you started and familiarized!
Resizing Blog Buttons
If you are weary of doing that this is the perfect solution, it does not involve any HTML work!!
*If your web browser is Chrome, exit out and use Mozilla or Internet Explorer. Chrome does not allow this option :(
Start from blogger dashboard. Click view blog. Now you're looking at your blog, scroll to the area of buttons you want to fix. At the bottom of that area should be a screwdriver/wrench icon. Click on that.
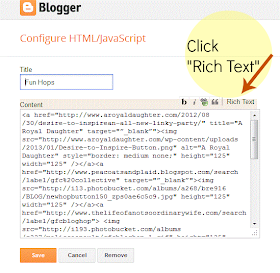
It will open your HTML in a pop up window. Now, click on Rich Text.
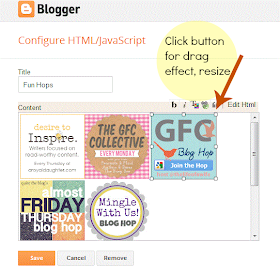
Once you click "Rich Text" angels sing, heaven opens. You hear the man of Staples saying, That was easy!
Your HTML switches to images. It's feels like hitting the jackpot. Now, click on each button that you want to resize. This will give you the drag effect. As you drag each corner larger or smaller you should see the height and width sizes, remember these numbers....so you can match your other buttons. If you already know the width of your sidebars then size your buttons accordingly. If you do not know the width of your sidebars you will need to play with this until you find which size fits best.
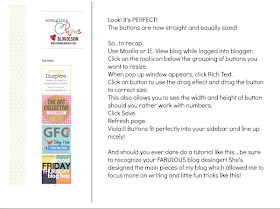
Once you have sized all your buttons remember to click SAVE!!! You may not have all your buttons loaded into one widget and that's fine. There is absolutely no problem with loading them separately. Be sure to open each one and repeat these steps, matching all button sizes and alignments. Save, refresh page and enjoy!
I've used blog hop buttons for this tutorial. It's the same idea for any button.
But, if you're using Passion Fruit to display your buttons... do not mess with that!
Blog design is tricky to learn, it's an endless process. I have total admiration for blog designers. Not only are they creative in their work but they are brilliant in their presentations. Majority of their work is done in the background, behind the blog's aesthetics. I am NO blog designer but as much as I learn, I will share with you. Ultimately, I feel, where there's a will...there is a way. If you truly want to learn this stuff then go for it! But if it steals from your joy of blogging then please get//pay for a blog design. There are thousands of options available to you! Little tricks like this one are easy enough to figure out as you go along but the overall look may not be. Whatever you choose template, paid for design, or DIY....just get your buttons, buttoned up! It drives me nuts to see them overlapping and zig-zagging! And, I always frown... wondering if you feel like I did before figuring out this trick?!
I really, really hope this helps some of you :)
I'm all ears for any comments or questions!!!
*check out my no-reply blogger post if you think you might be one!
*check out this easy way to make a grab button, if you're in need of one!


didnt know you can do this, i am going to add this link to my tutorial post that i am supposed to post today!!!
ReplyDelete-Rekita
Thanks so much for posting this! It's drives me nuts too! You did a great job of explaining how to do it.
ReplyDeleteSarah
limitedspaceorganizing.Blogspot.com
It's like you read my mind! I have been trying to figure this out for a while now! Thanks so much! I can't wait to get my computer back so I can try it!
ReplyDeleteThanks for sharing this.
ReplyDeletexoxo
Mags
http://magsmind22.blogspot.com/
Hi Dear! Thank you for sharing this great code. Lovely blog I love it! xoxo
ReplyDeletehttp://missrenaaye.blogspot.com
Thanks for sharing this! I always wondered how bloggers got there buttons so neat! ;)
ReplyDeleteThanks for the tip! I'm sure it's going to be so helpful.
ReplyDeleteHeidi’s Wanderings
Thanks for the tip! It's so detailed and helpful! I am definitely saving this for future reference!
ReplyDeleteThis is SUPER helpful! Thank you for posting!!!
ReplyDeletei knew about added center to the code but not about seeing it as images not code in blogger. thanks for sharing!
ReplyDeleteThis is great. Thank you so much for sharing.
ReplyDeletegreat post! i'm slowly learning html and posts like these are so helpful!
ReplyDelete-- jackiejade.blogspot.com
great post. I'll have to come back to this later when I'm fixing my button page b/c it needs fixing like a few other things
ReplyDeleteThis is a great tutorial! Bookmarking this.
ReplyDeleteHappy Monday!
Sheree
The Hartungs Blog
thehartungs.blogspot.ca
Wow! Good to know! I usually go through the hassle of resizing them through an image editor. This is way easier!
ReplyDeleteThis was such a wonderful help. YOU ARE THE BEST. SERIOUSLY! THANK YOU soo much for this information!!!
ReplyDeleteRebecca :)
Have you come across any blogs that this doesn't work on? I just tried to size the buttons, and the little drag feature never popped up. I tried clicking, and followed all the directions...Scouts honor!
ReplyDeleteCannot wait to try this. I have been searching for months to find a tutorial that makes sense to me and yours does!! New follower thru GFC. Thanks so much!
ReplyDeleteThank you so much for putting up this tutorial! It really helped me out!! :)
ReplyDeleteThis was so helpful-thank you so much! Pinned and plan to use a lot :-)
ReplyDeleteCathy @ three kids and a fish
I am SOOO GLAD I found your blog post! It took me a few tries to find the answer I needed and you most definitely provided it!!
ReplyDeleteIt worked! It could not have been easier!
Thanks so much for sharing this amazing tip! And yes, Angels did sing!! :-D
2015622dongdong
ReplyDeletewww.louisvuitton.com
ray ban sungalss
copy watches
hollister
true religion outlet
marc jacobs handbags
jordan concords
louis vuitton outlet
black timberland boots
toms shoes
mulberry handbags
gucci shoes
burberry outlet
michael kors outlet
michael kors
kobe shoes
chanel handbags
christian louboutin
christian louboutin outlet
ray ban glasses
oakley sunglasses cheap
nike air max
ray ban sunglasses
michael kors outlet
christian louboutin outlet
polo ralph lauren home
michael kors outlet online
nfl jerseys
gucci
hollister clothing
fitflops clearance
gucci outlet
michael kors outlet
lebron james shoes 2015
oakley vault
juicy couture
wedding dresses, montre pas cher, ugg,ugg australia,ugg italia, ugg boots, swarovski crystal, ugg boots, converse outlet, thomas sabo, links of london, replica watches, ralph lauren, ugg, toms shoes, hollister, ugg pas cher, uggs outlet, pandora charms, marc jacobs, louboutin, ugg,uggs,uggs canada, lancel, supra shoes, pandora jewelry, gucci, swarovski, vans, juicy couture outlet, uggs on sale, ugg uk, uggs outlet, hollister, converse, pandora uk, ray ban, nike air max, juicy couture outlet, coach outlet, karen millen uk
ReplyDeletetiffany and co
ReplyDeletebabyliss flat iron
true religion canada
hermes outlet
ferragamo outlet
tory burch outlet
louboutin pas cher
rolex watches
burberry outlet
louis vuitton neverfull
air max 90
true religion outlet uk
coach outlet
cazal outlet
polo ralph lauren
michael kors outlet online
ferragamo outlet
cartier sunglasses for men
michael kors handbags clearance
louis vuitton handbags outlet
oakley sunglasses wholesale
air max 2015
mulberry handbags sale
michael kors outlet
lululemon uk
ray ban sunglasses
true religion uk
adidas outlet
lululemon pants
beats by dr dre
ferragamo outlet
louis vuitton neverfull sale
hermes birkin
mulberry sale
mulberry outlet
20160604caihuali
ed hardy
ReplyDeletemichael kors handbags cheap
denver broncos jerseys
falcons jersey
michael kors handbags outlet
cowboys jerseys
versace
nike blazer pas cher
michael kors handbags
steelers jerseys
vera bradley outlet
ReplyDeletecheap air jordans
nike air huarache
Cheap Jordans For Sale
michael kors outlet store
michael kors outlet
adidas nmd
ultra boost
nike roshe run one
tiffany and co uk
ugg boots
ReplyDeletenike outlet online
adidas nmd
kate spade outlet store
canada goose jackets
jordan shoes
ugg boots canada
ugg outlet
uggs on sale
coach factory outlet
mt1010
zzzzz2018.7.16
ReplyDeleteugg boots clearance
fitflops
ralph lauren outlet
hermes belts
superdry clothing
uggs outlet
prada outlet
ugg boots
canada goose uk
ugg boots clearance